Documentation
Installation, activation, and complete control reference for all M Media Audio plugins.
Installation
Windows
M Media Audio plugins are distributed as VST3 bundles. No installer is required.
- Download the plugin zip from your order confirmation email or from My Account › Downloads.
- Extract the zip. You will find a
.vst3folder and a README. - Copy the entire
.vst3folder into your VST3 plugin directory. The standard Windows location is:C:\Program Files\Common Files\VST3\ - Restart your DAW and run a plugin scan. The plugin will appear under M Media Audio.
Do not extract the contents of the .vst3 folder. The entire folder is the plugin bundle - move it as a unit.
Supported Platforms and DAWs
All M Media Audio plugins ship as VST3 on Windows, macOS (Universal Binary - Apple Silicon and Intel), and Linux. AU format is also included for macOS, adding compatibility with Logic Pro, GarageBand, and MainStage. Tested in Reaper, Cubase, Studio One, Ableton Live, Bitwig, FL Studio, Cakewalk, and Nuendo.
macOS installation follows the same process as Windows. Copy the .vst3 bundle to /Library/Audio/Plug-Ins/VST3/ (system-wide) or ~/Library/Audio/Plug-Ins/VST3/ (current user). For AU, copy the .component bundle to /Library/Audio/Plug-Ins/Components/.
Linux installation follows the same process as Windows. Copy the .vst3 bundle to ~/.vst3/ (per-user) or /usr/lib/vst3/ (system-wide). Tested on Ubuntu 22.04/24.04, Debian 12, and Fedora 40, confirmed working in REAPER and Bitwig.
⚠ Linux Requirement: Install libsodium First
All licensed (non-free) plugins require libsodium for license verification. Most Linux distros do not include it by default. Without it, the plugin will fail to load with an error like libsodium.so.23: cannot open shared object file. Install it once per machine, before loading the plugin for the first time:
sudo apt install libsodium23        # Ubuntu / Debian
sudo dnf install libsodium          # Fedora / RHEL
sudo pacman -S libsodium            # Arch
Activation
Violet Crown, Volume Dealer, and Iron Deck are free plugins that require no activation and no license key. Reference Player is free on Windows and Linux. The information below applies to every other plugin in the catalog, and to every bundle - see Bundle Licensing for how a bundle key activates its member plugins.
Each license allows 3 simultaneous activations. Activation requires an internet connection. After activation the license is stored locally and the plugin runs fully offline.
- Load the plugin in your DAW. The activation screen will appear automatically on first use.
- Enter the email address used at purchase and your license key. Your license key is in the purchase confirmation email.
- Click Activate. The plugin will contact the license server and confirm your license.
- On success the plugin is fully unlocked. No further steps are needed.
Activation is per-machine. Installing on a second computer uses a second activation slot.
If you created an account at checkout, you can view your licenses and downloads at mmediaaudio.com/my-account/mmedia-licenses. Your purchase confirmation email is sent regardless of whether you have an account.
Activation on Linux
Plugin activation windows embedded inside Linux DAW hosts can make keyboard navigation awkward - focus management varies between hosts and the Tab key does not always behave the way you expect when you are several panels deep in the UI. Follow this sequence and it works reliably:
- Copy your license key first - open your purchase confirmation email, select the license key, and copy it to the clipboard (Ctrl+C) before you open the plugin.
- Load the plugin in your DAW. The activation screen will appear.
- Click the email address field and type your email address.
- Press Tab to move focus to the license key field.
- Press Ctrl+V to paste your license key.
- Click Activate or press Enter.
If Tab does not advance focus to the license key field, click directly into the license key field with the mouse, then paste. Some Linux hosts capture Tab at the host level and it never reaches the plugin window.
If the Activate button does not respond to a click, try clicking once in the plugin window first to ensure it has focus, then click Activate again. This is a known behavior in some Reaper and Bitwig configurations on Linux.
Demo Mode
All M Media Audio plugins include a fully functional demo mode. Every control works at full quality. The only limitation is a 2-second silence dropout every 30 seconds of playback.
To try the plugin before purchasing, click Try It on the activation screen. The silence will resume each time the plugin is loaded until a valid license is activated.
Deactivating a Machine
If you have used all 3 activation slots and need to activate on a new machine, contact info@mmediaaudio.com with your license key and we will reset a slot. Include the name of the machine being replaced if possible.
Self-service deactivation is planned for a future update.
Bundle Licensing
Every bundle ships as a single license key. That one key activates each plugin in the bundle independently - load any member plugin, enter the bundle's email and license key, and it activates on its own. You do not need a separate key per plugin.
Activation slots are tracked per plugin, not per bundle. A 3-plugin bundle gives you 3 activations on each of the 3 plugins - not 3 activations shared across all of them. Installing the full bundle on a studio machine and a laptop uses one of the three slots per plugin, on each machine.
Everything else - demo mode, deactivation requests, Linux activation steps - works identically to a single-plugin purchase. See Activation and Activation on Linux above.
Curve Control
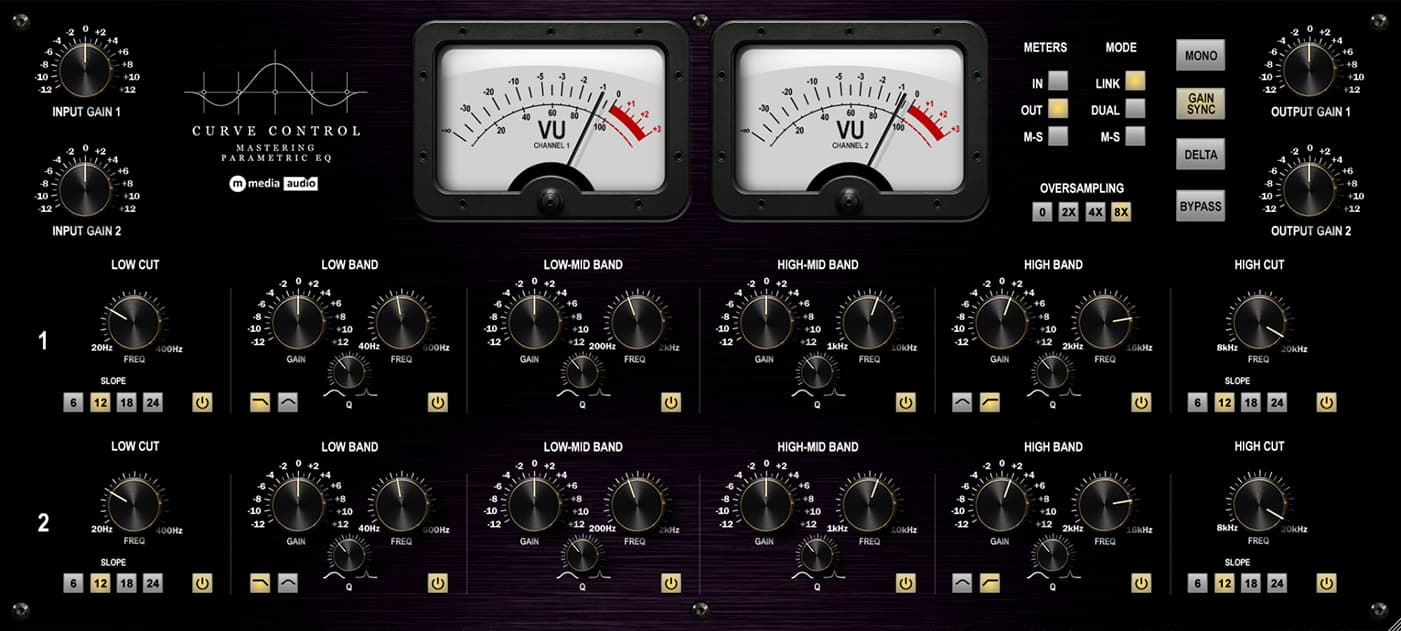
Curve Control is a dual-channel mix and mastering parametric EQ with six fully parametric bands per channel, three channel modes, always-on level-dependent harmonic saturation, and a professional monitoring toolset. Two large VU meters are the primary display. Activation required - see Activation above. Demo mode: full DSP active, 2-second silence dropout every 30 seconds.
Channel Modes
- Link - Both channels ganged. One set of six bands shapes L and R identically. Standard stereo EQ operation.
- Dual - Each channel carries its own fully independent six-band curve. No ganging. Use for asymmetric correction or when L and R genuinely need different treatment.
- M/S - The stereo input is encoded to Mid (L+R) and Side (L-R) before the EQ chain. Channel A processes the Mid. Channel B processes the Side. The signal is re-encoded to stereo at the output. What goes in is stereo. What comes out is stereo. The EQ decisions happen in the M/S domain in between.
Switching channel modes does not reset your band settings. Whatever each channel had dialed in carries over to the new mode. If Channel B had aggressive boosts set during Dual work and you flip to M/S, those boosts are now on the Side signal. Check both channels before switching modes on a live session.
Band Reference
Six bands per channel. In Link mode Channel B mirrors Channel A. In Dual and M/S modes all twelve bands are fully independent.
| Band | Type | Range | Notes |
|---|---|---|---|
| 1 | High-pass filter | 20-400 Hz | Four slopes: 6, 12, 18, 24 dB/oct. Slope is a tonal decision - 6 dB/oct keeps warmth below the cutoff, 24 dB/oct is a hard stop. |
| 2 | Shelf or Bell | 40-600 Hz | Switchable between shelf and bell mode. Independent Q in both modes. Low Q shelf produces a broad Baxandall-style lift. Higher Q produces a more resonant curve. |
| 3 | Bell | Low-mid | Fully parametric frequency, gain, and Q. Surgical low-mid correction. |
| 4 | Bell | High-mid | Fully parametric frequency, gain, and Q. Surgical high-mid correction. |
| 5 | Shelf or Bell | 2-16 kHz | Mirrors Band 2 behavior at the high end. Switchable shelf/bell, independent Q. |
| 6 | Low-pass filter | 8-20 kHz | Four slopes: 6, 12, 18, 24 dB/oct. Mirrors Band 1 at the high end. |
Every band has an independent enable. Disabled bands are bypassed but retain their settings.
Monitoring Tools
- Delta - Inverts the dry signal and sums it with the processed output. On a flat EQ the result is near-silence. Engage a band and Delta isolates exactly what that band is contributing. Use it to identify problem frequencies before committing to a cut, or to confirm that a boost is doing what you think it is doing.
- Gain Sync - Ties the output gain to the inverse of the input trim. When input goes up, output comes down by the same amount. Net signal level stays consistent, so your tonal evaluation is not influenced by loudness. Disable Gain Sync when you want the input to drive the saturation stage harder - the tradeoff is that every level change affects the comparison.
- Mono - Collapses the stereo output to mono. Use for translation checking - confirms that the mix holds together without the stereo field, and exposes anything the width was masking.
- Meter Source - Switches the two VU meters between three views: Input (what is arriving), Output (what you are sending), and M/S (Mid and Side levels derived from the output). The M/S position is available regardless of which channel mode is active - it shows you the stereo balance picture on a needle at all times.
Saturation
A level-dependent soft saturation stage runs at the output of each channel, after the EQ and output gain. It is not a user control - there is no knob and no bypass for this stage. It is part of the sound of the plugin. The model is 2nd harmonic biased and calibrated at low drive. At moderate signal levels with conservative EQ the effect is subtle. As input level increases or EQ boosts accumulate, harmonic weight increases with the signal.
There is no way to bypass the saturation stage independently. The full plugin bypass (if your DAW provides one) bypasses everything including the EQ. If you want to evaluate the EQ in isolation you cannot - the saturation is always part of the sound. This is by design.
Oversampling
Four positions: Off, 2x, 4x, 8x. Oversampling wraps the saturation stage only - not the full signal path. This keeps added latency lower than full-path oversampling while still reducing aliasing from the nonlinear stage. At Off and 2x the latency is plugin buffer only. At 4x and 8x latency increases and your DAW will need to compensate via PDC. For mixing sessions use 2x or 4x. For final export use 4x or 8x. Off is appropriate for tracking where minimal latency matters more than distortion purity.
Working With Curve Control - Common Challenges
Curve Control has a steeper initial learning curve than a typical visual parametric EQ. These are the places where most engineers run into trouble.
Making EQ decisions without a frequency display
There is no visual curve. The workflow is entirely by ear. If you are accustomed to visual EQ, the first few sessions will feel uncomfortable - you will reach for a display that is not there. The practical adaptation is to work band by band: enable one band, sweep the frequency while listening, stop when you hear what you are addressing, then adjust gain. Delta mode accelerates this - it lets you hear exactly what each band is doing before you commit to a level. Develop a reference sense for where frequency ranges sit in the material before you reach for the EQ controls.
Delta mode sounds like silence - that is correct
When you engage Delta with a flat EQ, the output goes nearly silent. This is not a bug and nothing is broken. Delta works by inverting the dry signal and summing it with the processed output. When the EQ is flat, processed and dry are identical, so they cancel. Near-silence confirms the EQ is not doing anything. The moment you engage a band and add gain or cut, Delta isolates exactly that change in the signal. If Delta sounds like near-silence on a band you thought was doing something, that band is not actually audible at its current settings.
Gain Sync moves the output when you touch the input
With Gain Sync on, raising the input trim lowers the output by the same amount. This is intentional - it holds net loudness constant so you can evaluate tone without loudness bias. Engineers who are not expecting it will turn the input up, hear no change in level, and assume the plugin is not responding. It is responding - the output compensation is working. To hear the saturation stage respond to drive, turn Gain Sync off. The tradeoff is that level changes will now affect your A/B comparison.
M/S mode: what changes and what does not
In M/S mode Channel A processes the Mid signal (L+R sum) and Channel B processes the Side signal (L-R difference). Any boost or cut on Channel A affects primarily the center of the image - vocals, kick, bass, anything panned to center. Channel B affects the width - room, reverb, anything spread across the stereo field. A low shelf boost on Channel A adds weight to the center. The same boost on Channel B adds weight to the sides only. These are fundamentally different operations. Gain changes on the Side channel also affect perceived stereo width - boosting the Side widens the image, cutting it narrows it.
Phase is the other consideration. An EQ applied asymmetrically in M/S mode can introduce a phase relationship between Mid and Side that was not present before. Cuts are generally safe. Large boosts, particularly narrow-Q boosts near problem frequencies, can create artifacts that are audible on mono playback. Use the Mono button to check after any aggressive M/S work.
Switching channel modes carries over your settings
Channel modes do not reset band settings when you switch between them. If Channel B had a significant boost set while working in Dual mode and you switch to M/S, that boost is now applied to the Side signal. This can produce a significant output change or an unexpected stereo image shift. Before switching modes, either zero out Channel B or make a note of its current state. The safe workflow is to establish your initial settings in the mode you intend to use rather than switching mid-session.
Twelve independent bands in Dual and M/S are easy to lose track of
In Link mode you have six bands and they are visible and active. In Dual and M/S modes you have twelve. Bands on Channel B that were set to flat in Link mode carry over as flat independent bands in Dual or M/S mode, which is correct. But if Channel B was ever touched independently before you switched to Link, those settings are preserved and become active again when you return to Dual or M/S. Check both channels when loading a saved preset or returning to a plugin instance after a channel mode change.
The saturation stage cannot be bypassed independently
There is no way to compare the EQ with and without the saturation stage in a single A/B. The saturation is always running. If you are trying to use Curve Control as a purely clinical, transparent parametric EQ and the coloration is not what you want, this is not the right tool for that application. If subtle harmonic weight from the saturation stage is a benefit, keep it. If it is a problem, a different EQ is the answer.
Oversampling at 4x and 8x adds meaningful latency
Higher oversampling settings add latency that your DAW compensates for via plugin delay compensation. In most mixing scenarios this is handled automatically. The issue surfaces in two places: first, if your DAW's PDC implementation has limits or bugs, high-latency plugins can cause sync problems with other tracks. Second, during live monitoring or tracking, the compensation means you are hearing the plugin output delayed. For tracking or monitoring contexts, use Off or 2x. Save 4x and 8x for mixing and export where latency is compensated and does not affect your workflow.
Closing and reopening the plugin window crashed the host on versions before 1.0.1
Versions prior to 1.0.1 could crash the host when the plugin window was closed and reopened a second time. This is fixed in 1.0.1. If you are running an older version, update to the latest build - the download link is the same one from your original purchase.
Sugar Engine
Sugar Engine is an opto vocal channel strip with four independent processing stages running in series: opto compressor, parametric EQ, dual de-esser, and doubler. Each stage has its own bypass. Global Input and Output controls sit at either end of the chain. No oversampling - plugin buffer latency only, suitable for tracking and live use. Activation required - see Activation above. Demo mode: full DSP active, 2-second silence dropout every 30 seconds.
Signal Chain
Stages run in this fixed order: Input trim → Compressor → EQ → De-esser 1 → De-esser 2 → Doubler → Output trim. The order is not user-adjustable. Compression before EQ means the EQ is shaping an already-leveled signal. De-essers after EQ means any presence boost from the EQ is seen by the de-esser detectors. Doubler last means the width and depth controls operate on the fully processed vocal.
Global Controls
- Input - -12 to +12 dB. Pre-chain gain trim applied before the compressor. Raising Input drives the compressor harder - more Peak Reduction at the same knob position. Lower Input for gentle compression on loud sources.
- Output - -12 to +12 dB. Post-chain output trim applied after the doubler.
- Global Bypass - Hard bypass of the entire plugin. All stages bypassed simultaneously.
Compressor
Opto gain-reduction character: slower attack, two-stage program-dependent release. The longer the compressor works, the slower it releases - the photocell memory effect. Attack is fixed at approximately 10 ms, calibrated for vocal work and not user-adjustable.
- Peak Reduction - 0-100%. Combined threshold and input gain in a single control. More Peak Reduction increases both the amount of compression and the drive into the detector. Higher values produce more gain reduction.
- Gain - -6 to +18 dB. Makeup gain after gain reduction. Adjust after setting Peak Reduction to compensate for level lost to compression.
- Ratio - Three positions: 2:1 for gentle leveling, 4:1 for most vocal work, 8:1 for firm limiting.
- Release - Full left engages Auto mode: program-dependent release that adapts continuously to the dynamics of the performance. Any other position sets a fixed release time from short to slow. Start with Auto for most vocal material.
- VU Meter Source - Two-position switch. GR reads gain reduction (0 at top, downward). Input reads incoming signal level on a standard VU scale.
- Compressor Bypass - Bypasses the compressor section only. Gain and Peak Reduction settings are retained.
Parametric EQ
Six bands covering the full vocal frequency range. Bands 1, 2, and 4 have fixed musical Q - frequency and gain only. Band 3 is the only band with user-adjustable Q. All filters use the same IIR topology as the rest of the M Media Audio catalog.
| Band | Range | Type | Notes |
|---|---|---|---|
| HPF | 20-300 Hz | High-pass, 12 dB/oct | Cuts room noise and low-end buildup below the vocal. Roll off rather than hard cut for most sources. |
| Band 1 | 60-500 Hz / ±12 dB | Bell, fixed Q | Low body. Use for warmth or to cut low-end mud and boom. |
| Band 2 | 200 Hz-2 kHz / ±12 dB | Bell, fixed Q | Mud and warmth zone. Narrow cuts here open up the vocal without affecting the top end. |
| Band 3 | 1-8 kHz / ±12 dB | Bell, adjustable Q | Presence and harshness. The surgical band. Widen Q for broad presence lifts, narrow for targeted cuts on problem resonances. |
| Band 4 | 6-20 kHz / ±12 dB | Shelf, fixed Q | Air. Broad shelf lift adds presence and open character to the top end. |
| LPF | 8 kHz-20 kHz | Low-pass, 12 dB/oct | Rolls off high-frequency harshness when needed. |
Band 3 and Band 4 frequency ranges overlap (1-8 kHz and 6-20 kHz respectively). At the upper end of Band 3 you are working in the same region as the lower end of Band 4. When both bands are active in the same area their curves sum.
- EQ Bypass - Bypasses the EQ section only. All band settings are retained.
De-esser 1 - Sibilance
Targets sustained sibilance in the 6-10 kHz range - the S sounds that sit and accumulate in a vocal performance. Frequency-aware gain reduction on the detection band only.
- Freq - 6k-10k Hz. Sets the center frequency of the detection and reduction band. Tune to the specific S character of the vocal source - different microphones and vocalists peak at different points in this range.
- Amount - 0 to -20 dB. Maximum gain reduction applied in the detection band when triggered. Start around -6 dB and increase until sibilance is controlled without dulling the top end.
- Listen - Latching button. Auditions the detection band in isolation - you hear only what the de-esser is detecting. Use this to find the exact frequency where the sibilance lives, then disengage Listen and set Amount. Do not leave Listen engaged during normal processing.
- DS1 Bypass - Bypasses De-esser 1 only.
De-esser 2 - Hard Consonants
Targets hard consonant transients in the 4-8 kHz range - the crack and attack of T, K, and CH sounds. These are faster and lower in frequency than sustained sibilance. DS1's integration time and detection range are calibrated for sustained S sounds; it will typically miss hard consonant attacks entirely. DS2 uses a faster detector response specifically tuned to catch transients before they pass.
- Freq - 4k-8k Hz. Tune to the consonant character of the vocal. Hard T attacks often peak lower in this range; CH sounds may sit higher.
- Amount - 0 to -20 dB. Maximum gain reduction. Hard consonants can tolerate more reduction than sibilance because they are transient - the effect is less noticeable on a brief attack than on a sustained sound.
- Listen - Same behavior as DS1 Listen. Auditions the DS2 detection band in isolation.
- DS2 Bypass - Bypasses De-esser 2 only.
DS1 and DS2 operate independently on separate frequency ranges. A vocal that needs both - sustained S sounds and hard T/K/CH attacks - can have both de-essers active simultaneously at different Freq and Amount settings.
Doubler
Short delay with slow chorus modulation on the delayed signal. Mono in, stereo out. The doubler stage outputs a stereo signal regardless of what comes before it - if your channel is mono, it widens here. Mix at 0% is fully dry and mono. Increasing Mix blends in the doubled signal and introduces width.
- Time - 10-35 ms. Delay time of the doubled signal. Shorter times feel more fused with the dry signal. Longer times create a more distinct second-voice character. 15-25 ms covers most vocal doubling work.
- Rate - 0.1-1.5 Hz. Modulation speed of the chorus on the delayed signal. The upper limit of 1.5 Hz is intentional - faster rates cross from doubling into chorus. Keep Rate slow and the doubled signal wanders naturally in time like a second take.
- Depth - 0-100%. How far the modulation drifts. Higher Depth makes the doubled signal wander more. Too much Depth with any Rate above 0.5 Hz starts to sound like pitch modulation. Keep Depth moderate.
- Width - 0-100%. Stereo spread of the doubled signal. 0% places both dry and doubled signal at center. 100% spreads the doubled signal to hard left-right. For natural doubling stay in the 60-80% range.
- Mix - 0-100%. Blend of the doubled signal into the output. The dry signal level is unaffected by Mix - raising Mix adds the doubled signal in parallel without reducing the dry level.
- Doubler Bypass - Bypasses the doubler. Output returns to mono when bypassed if the doubler was the only stereo source.
The Black Clamp
The Black Clamp is a dual-channel FET compressor built on a JFET gain-reduction topology. Two fully independent channel strips - every parameter is per-channel. Link mode mirrors the left channel to the right for fast stereo setup but is not a lock. Activation required - see Activation above. Demo mode: full DSP active, 2-second silence dropout every 30 seconds.
Per-Channel Controls
All controls below are fully independent on each channel strip.
- Input - -12 to +12 dB. Applied before gain reduction. Higher input drives more compression and more harmonic character from the saturation stage.
- Output - -12 to +12 dB. Makeup gain after gain reduction. Independent of Input.
- Attack - 20µs to 800µs, continuous. Double-click snaps to classic hardware positions: 20 / 50 / 100 / 200 / 400 / 800µs.
- Release - 50ms to 1100ms, continuous. Double-click snaps to classic positions: 50 / 100 / 200 / 400 / 800 / 1100ms. See Auto Release below.
- Auto Release - Per-channel toggle. When engaged, release time is program-dependent - adapts continuously to signal content. Overrides the Release knob position.
- Ratio - Detented 6-position knob: 2, 4, 8, 12, 20, ALL. See ALL Mode below.
- SC HPF - Detented 4-position knob: Off, 60 Hz, 100 Hz, 200 Hz. Rolls off low-frequency content from the sidechain detector only. The audio signal is unaffected. Use 100 Hz for most bus work to prevent kick and bass from driving excessive gain reduction.
- Mix - 0-100% wet/dry blend per channel. Link mode never affects Mix - each channel's Mix is always independent.
ALL Mode
The ALL position on the Ratio knob engages a modified gain computer with a fixed 12:1 effective ratio, a 3 dB soft knee, and additional 2nd harmonic injection. It is the most aggressive setting on the dial - pumps, saturates, and behaves differently from all other ratio positions. This is the approach behind the classic "all-buttons" hardware technique.
Global Controls
- Link - Mirrors all left-channel controls to the right channel in real time. See Link Sides below.
- Mode - Three positions:
- Stereo - Shared sidechain (sum of L+R). Identical gain reduction on both channels. Preserves stereo image.
- Dual Mono - Independent detectors and gain computers per channel. Use for parallel processing or asymmetric material.
- M/S - Converts input to Mid and Side, processes each independently, then converts back. Left strip = Mid, Right strip = Side. Built-in M/S compression without external routing.
Link Sides
Link mirrors all left-channel controls to the right channel in real time - Attack, Release, Ratio, Input, Output, SC HPF all follow the left strip as you adjust it. The intended workflow: enable Link, dial in your compression on the left, both channels track together.
Link is not a lock. The moment you touch a control on the right channel it holds its new position independently - nothing snaps back to the left. The left channel is always the reference. The right channel is always free to diverge.
- Mix is never affected by Link - each channel's wet/dry blend is always independent regardless of Link state.
- Stereo mode + Link - Shared sidechain plus matched settings. Classic linked stereo compressor behavior.
- Dual Mono + Link - Start matched, diverge intentionally. Use Link to establish a baseline, then adjust the right strip for channel-specific material.
- M/S mode + Link - Available but rarely correct. Mid and Side almost always need different settings - different ratios, different attack, different thresholds. Set each strip independently in M/S mode.
Metering
- VU Meters - One per channel. Gain reduction only (0 at top, reads downward). 300ms ballistic response.
- Input LED Bars - 11-segment peak bars per channel strip (green / yellow / red). Fast peak response.
Saturation
A JFET-modeled saturation stage runs after gain reduction on each channel. It is driven by the Input control - higher input levels produce more 2nd and 3rd harmonic content, with 2nd harmonic dominant (asymmetric clipping, as FETs clip asymmetrically). At conservative input levels it adds subtle color. Push the Input hard and it adds density and presence. The saturation stage is always active - it is not a separate bypass.
Magic Buss
Magic Buss is a three-stage bus compressor running FET, VCA, and Vari-Mu compressors in series, each with its own parallel blend knob. A six-band parametric EQ follows the compressors, and a saturation stage adds tape and console character before the output trim. The default stereo link behavior is unlinked - each compressor runs independent L/R detectors, which is the primary differentiator from most bus compressors. Activation required - see Activation above.
FET Compressor
Peak detector. Fast, forward, punchy. Adds presence and transient grip. Hard knee.
- Threshold - -40 to 0 dB. Where gain reduction begins.
- Attack - 20µs to 800ms. How quickly the compressor clamps after threshold is crossed.
- Release - 50ms to 1.1s. How quickly gain reduction recovers.
- Ratio - 2:1, 4:1, 8:1, 12:1 selector.
- Makeup Gain - -12 to +12 dB.
- Mix - 0-100% parallel blend at this stage only.
- Link - Toggle between unlinked (default) and linked stereo.
- In/Out - Bypasses this compressor stage. EQ and other stages continue.
VCA Compressor
RMS detector. Clean, transparent glue. Soft knee. Makes elements feel like one record without adding color.
- Threshold - -40 to 0 dB.
- Attack - 0.1ms to 30ms.
- Release - Fully clockwise = program-dependent auto release (shortens on sustained signals, lengthens on transients). Any other position: fixed release from 100ms to 1.1s. No separate button - turning fully clockwise activates it silently.
- Ratio - 2:1, 4:1, 8:1, 12:1 selector.
- Makeup Gain - -12 to +12 dB.
- Mix - 0-100% parallel blend at this stage.
- Link - Unlinked by default.
- In/Out - Bypasses this stage.
Vari-Mu Compressor
Program-dependent time constants. Slowest and warmest of the three. Inherently adds subtle even-harmonic content - this is the warmth stage. Very soft knee.
- Threshold - -40 to 0 dB.
- Attack - 10ms to 300ms. Inherently slow - by design.
- Release - 40ms to 4s. Program-dependent behavior even at fixed settings.
- Ratio - 1.5:1, 2:1, 3:1, 6:1 selector. Gentler ratios than FET or VCA.
- Makeup Gain - -12 to +12 dB.
- Mix - 0-100% parallel blend at this stage.
- Link - Unlinked by default.
- In/Out - Bypasses this stage.
Order Switch
Dropdown selector for the serial order of the three compressor stages. All six permutations available. Default: FET → VCA → Vari-Mu. Changing the order changes what each compressor reacts to - the FET in position one responds to the raw mix; in position three it responds to whatever the VCA and Vari-Mu have already shaped. Each permutation has a meaningfully different character.
| Index | Order |
|---|---|
| 0 (default) | FET → VCA → Vari-Mu |
| 1 | FET → Vari-Mu → VCA |
| 2 | VCA → FET → Vari-Mu |
| 3 | VCA → Vari-Mu → FET |
| 4 | Vari-Mu → FET → VCA |
| 5 | Vari-Mu → VCA → FET |
Stereo Link
Each compressor stage has an independent Link toggle. Default is unlinked on all three stages.
- Unlinked (default) - L and R each run a fully independent detector and gain computer. The GR meters for that stage will show different readings when stereo content is uneven. The stereo field responds more naturally - width breathes rather than being locked down uniformly.
- Linked - A single detector takes the maximum of |L| and |R|, computes one gain reduction value, and applies it identically to both channels. Classic bus compressor behavior. Preserves strict stereo image integrity.
Mix and match per stage: FET unlinked for transient openness, VCA linked for cohesion, Vari-Mu unlinked for warmth that breathes.
GR Meters
Each compressor stage has two GR meters - L and R independently. Six total. When a stage is linked, both meters will show the same reading. When unlinked, they diverge based on the actual gain reduction being applied to each channel. This is the clearest visual indicator that unlinked stereo is working as intended.
EQ Section
Six bands running after all compressor stages. No real-time curve display - the popup label shows the precise value while adjusting any knob.
| Band | Type | Range | Default |
|---|---|---|---|
| HP | Butterworth highpass - Off/6/12/18/24 dB/oct | 20Hz - 500Hz | Off |
| Low | Low shelf or bell (switchable) | 20Hz - 500Hz | 100Hz, shelf, 0dB |
| Lo-Mid | Parametric bell | 50Hz - 2kHz | 300Hz, 0dB, Q 0.7 |
| Hi-Mid | Parametric bell | 500Hz - 16kHz | 3kHz, 0dB, Q 0.7 |
| High | High shelf or bell (switchable) | 1kHz - 22kHz | 8kHz, shelf, 0dB |
| LP | Butterworth lowpass - Off/6/12/18/24 dB/oct | 1kHz - 22kHz | Off |
The Q knob grays out on the Low and High bands when shelf mode is active. The HP and LP slope selector includes an Off position - this doubles as the band enable.
Saturation
Single Drive knob, 0-100%. Runs after the EQ, before output gain. Tanh waveshaper calibrated for tape and console transformer character - at 100% this adds density and harmonic richness, not overdrive. Most bus work sits between 10% and 40%. At 0% the stage is fully linear.
Output Gain
-12 to +12 dB trim, after saturation. Use this to match output level against bypass for accurate A/B comparison.
Bypass
Hard bypass. All processing halts. VU needles decay to rest.
VU Meters
Dual VU meters showing output level on L and R channels independently. 300ms ballistic RMS. When both needles track together, the stereo image is balanced. When one leads the other, the unlinked compressors are responding to an asymmetric mix.
Suggested Starting Points
- Start with all three stages In, Mix at 20-30% per stage, no EQ, saturation at 0. Listen to what just the compression chain does at gentle parallel blend.
- FET first in the chain for punch into glue into warmth (default). Vari-Mu first for warmth shaping what the faster compressors react to - a fuller, rounder result.
- Keep Link off (default) and watch the GR meters. If they diverge often, your mix has stereo imbalance the compressors are correcting independently - often the right call.
- Dial in EQ after compressors are set. Low shelf on the Low band to recover low end the compressors may have softened. Hi-Mid cut if the mix has been compressed into harshness.
- Saturation at 15-25% after the EQ for the last bit of density. Listen for glue in the top end and cohesion in the low-mids.
Alternate Timeline
Alternate Timeline models the tonal character of six analog console eras. Each era sets a complete DSP state - EQ curves, compression character, saturation amount, stereo width, and output compensation - derived from the way records actually sounded in that decade. The knobs let you push further into or away from that character. Use it on individual tracks, bus groups, the 2-bus, or the master chain. The parallel Blend control means it never has to dominate the source.
Era
Selects the active console era. Each era is a complete preset that sets baseline EQ, compression threshold and ratio, saturation amount, stereo width, and output gain compensation. All other knobs operate relative to the selected era.
| Era | Character | Bottom | Middle | Top | Notes |
|---|---|---|---|---|---|
| 1960s | Psychedelic / tape | 100 Hz shelf | 800 Hz peak | 8 kHz shelf | Limited bandwidth, wide hard-panned stereo, heavier saturation |
| 1970s | Warm / fat | 80 Hz shelf | 1 kHz peak | 12 kHz shelf | Fat low end, musical air, British console compression character |
| 1980s | Punchy / glassy | 100 Hz shelf | 2 kHz peak | 13 kHz shelf | Tighter transients, early digital top end, low saturation |
| 1990s | Extended / open | 60 Hz shelf | 3 kHz peak | 16 kHz shelf | Better converter feel, extended sub, full air. Default era. |
| 2000s | Slammed / hyped | 60 Hz shelf | 2 kHz peak | 16 kHz shelf | Loudness war character. Heavy compression, boosted sub and air. |
| Modern | Clean / loud | 80 Hz shelf | 1.5 kHz peak | 16 kHz shelf | Minimal saturation, heavy parallel compression into limiter. |
Bottom / Middle / Top
Three EQ knobs operating in the frequency range set by the active era. Each knob adjusts gain relative to the era baseline - center position (0 dB) applies the era's native character without additional boost or cut. Range is -8 to +8 dB.
- Bottom - Low shelf centered at the era's bass frequency. Controls weight and fullness.
- Middle - Peak filter centered at the era's midrange frequency. Controls presence and body.
- Top - High shelf centered at the era's air frequency. Controls brightness and openness.
Comp
Adjusts the parallel compressor threshold relative to the era baseline. Range is -12 to +12 dB. Negative values increase compression depth; positive values back off. At center (0 dB) the compressor runs at the era's native threshold.
The compressor always runs in parallel - the Blend knob controls how much of the compressed signal is mixed back in. Comp sets how hard the compressor works; Blend sets how much you hear it.
Blend
Parallel compression wet/dry mix. At 0% only the dry signal passes. At 100% the full compressed signal is mixed at the era's compression ratio. Most program material responds well between 30-70%.
Saturation
Three-position switch controlling the era's tape/transformer saturation character.
- On - Full era saturation amount applied.
- Middle - Half saturation amount. Useful when stacking with other saturation sources.
- Off - Saturation bypassed entirely. EQ and compression still active.
Saturation amount varies significantly by era. The 1960s preset applies considerably more saturation than the Modern preset at the same switch position.
Limiter
Brick-wall output limiter ceiling. Range is -3 to 0 dBFS. The limiter sits at the end of the processing chain after output gain. At -1.5 dBFS (default) it provides transparent overload protection without audible limiting under normal operation. Lower settings produce harder catch behavior for loud material.
Output
Output gain trim, -6 to +6 dB. Applied after the limiter ceiling. Each era includes internal output compensation to normalize approximate loudness across eras - this knob provides additional fine-tuning for level-matched comparisons with bypass.
Bypass
Hard bypass. Clicking the power switch passes audio unprocessed. All metering stops. Useful for A/B comparison at matched levels - use Output to compensate for any loudness difference before bypassing.
VU Meters
Two VU meters showing input level (left) and output level (right). Both use 300ms ballistic RMS, matching the response of a standard VU meter. 0 VU corresponds to -18 dBFS RMS; full deflection is approximately -3 dBFS RMS.
Suggested Starting Points
- Match the era to the decade the album was recorded in, then adjust Bottom/Top to fit the release.
- Set Blend to 40-50%, then use Comp to taste. Listen to the kick drum and bass relationship.
- Use Output to null the loudness difference with bypass before making EQ decisions.
- For modern mixes going for a vintage feel, try 1970s with Saturation on Middle and Blend around 35%.
Speaker Breaker
Speaker Breaker is a low-end balance processor. It continuously analyzes five frequency bands across the low end and applies dynamic gain reduction to any band that is too prominent relative to the overall signal level. The result is a more controlled, consistent low-end balance without heavy-handed EQ. The pilot light illuminates whenever correction is active.
How It Works
The plugin measures the RMS energy of five analysis bands - sub, kick bass, bass, upper bass, and low-mid - and compares each against the full-band RMS level. If a band is louder relative to the mix than the Contour threshold allows, a peak filter applies gain reduction to that band. The correction is smoothed over 50ms to prevent pumping. All processing happens in parallel via the Mix knob.
It does not add frequencies. It only reduces bands that are over-represented. A band that is sitting correctly is left completely untouched.
Mix
Wet/dry blend between the uncorrected signal and the corrected signal. Range 0-100%. At 100% the full correction is applied. Lower values reduce the aggressiveness of any correction that occurs. Default is 100%.
If the correction feels heavy-handed on a particular track, reducing Mix to 60-70% often preserves the benefit while keeping more of the original character.
Pilot Light
The amber indicator on the plugin face illuminates whenever any band is receiving gain reduction greater than 0.5 dB. A light that is constantly on indicates continuous correction - this is normal and expected behavior. A light that never comes on means the low-end balance is already within the Contour thresholds for the current material.
Bypass
Hard bypass. Passes audio unprocessed. The pilot light and VU meters stop when bypassed.
VU Meters
Input (left) and output (right) level meters. 300ms ballistic RMS. On well-controlled material, input and output levels should read approximately the same - Speaker Breaker does not change overall loudness, only the internal low-end balance.
Suggested Use
Speaker Breaker is effective anywhere low-end balance is a concern - not only on the master chain.
- Individual tracks - Tame a bass guitar or kick drum that is inconsistent across sections.
- Drum bus - Keep sub and kick from overpowering the overhead and room mics as the arrangement builds.
- Bass bus - Control the sub-to-body ratio across a layered bass sound.
- 2-bus or master chain - Insert after EQ, before limiting. Start with Neutral and Mix at 100%. A/B with bypass and listen to the kick and bass relationship.
- If the result feels over-corrected on any source, try Warm before reducing Mix.
- Effective on material assembled from stems with inconsistent low-end levels, or music with heavy sub content that shifts across sections.
Velvet Crush
Velvet Crush is a high-frequency balance processor. It works identically to Speaker Breaker but operates on six bands in the upper frequency range - presence, edge, clarity, sparkle, air, and ultra-air. It continuously analyzes how each band sits relative to the full-band level and applies dynamic gain reduction to bands that are over-represented. The result is a smoother, more natural high end without dulling the mix.
How It Works
Six analysis bands spanning the upper frequency range are measured and compared against the full-band RMS level. Any band that is too prominent relative to the mix receives dynamic gain reduction via a matching correction filter. All processing happens in parallel via the Mix knob.
As with Speaker Breaker: Velvet Crush does not add frequencies and does not affect bands that are already balanced. It only pulls back what is too forward.
Mix
Wet/dry blend between the uncorrected signal and the corrected signal. Range 0-100%. Default is 100%. Reduce Mix if the correction feels too aggressive on the material.
Pilot Light
Illuminates whenever any high-frequency band is receiving gain reduction. Behavior is the same as Speaker Breaker.
Bypass
Hard bypass. Passes audio unprocessed.
VU Meters
Input and output level meters with 300ms ballistic RMS. As with Speaker Breaker, overall loudness should be approximately unchanged - the meters confirm this.
Using Speaker Breaker and Velvet Crush Together
The two processors are designed as a complementary pair. All five plugins work on individual tracks, bus groups, the 2-bus, or the master chain - mix and match placements based on where the problem is. Running Speaker Breaker before Velvet Crush on the same bus addresses both ends of the spectrum independently. Alternate Timeline and The Mad Scientist can sit before or after both, depending on whether you want era character and saturation applied before or after the balance correction.
A common 2-bus or master chain: Alternate Timeline › The Mad Scientist › Speaker Breaker › Velvet Crush › Volume Dealer.
On a drum bus: Speaker Breaker on Neutral to manage kick and sub, Velvet Crush on Silk to take the edge off overhead harshness without dulling the cymbals.
Violet Crown works well on any stereo bus before the final limiter stage - its RMS compressor pairs naturally with Speaker Breaker and Velvet Crush when you need EQ alongside dynamic balance correction in the same insert.
The Mad Scientist
The Mad Scientist is a parallel RMS compressor with input-driven saturation. Even-order harmonic character is baked into the input stage - push the Gain control and the saturation scales smoothly with the signal; back off and it cleans up. The fixed 4:1 ratio keeps the compressor musical without requiring you to think about it. M/S mode processes mid and side channels independently so stereo width stays intact under heavy compression. Activation required - see Activation above.
Gain
Input trim, -12 to +12 dB. Applied before the parallel split, so saturation is added to both the wet (compressed) and dry signals equally. Increasing Gain is the primary way to drive the tanh saturation stage - louder input produces more even-order harmonic character. Back off for a clean pass.
Mix
Parallel blend between the uncompressed dry signal and the compressed wet signal. Range 0-100%. At 0% only the dry signal passes (saturation still applies via Gain). At 100% full compression is mixed in. 50% delivers full body with intact transients. Most bus work lands between 60 and 100%.
Threshold
Compressor threshold, -60 to 0 dB. Sets the level at which gain reduction begins in the wet path. Because compression is parallel, a lower threshold does not squash the output - it adds more density to the wet component that gets blended back via Mix.
Harder / Softer
Compression ratio, 1.5:1 to 8:1. Tuned for bus use. Lower ratios (Softer) produce gentle, musical gain control - useful on full mixes. Higher ratios (Harder) add more density and grip. Combined with Mix, this controls how aggressive the wet signal sounds before it gets blended in.
Attack
Compressor attack time, 1 to 200 ms. Controls how quickly the compressor clamps down after the signal crosses threshold. Shorter times catch transients in the wet path; longer times let transients through before the compression settles in.
Release
Compressor release time. Fully left: program-dependent auto-release - adapts continuously, fast when working hard to prevent pumping, slow when barely touching. Any other position: 50 to 2000 ms fixed. For bus work, start with auto-release and adjust from there.
Comp Gain
Makeup gain applied to the wet compressed signal, -10 to +10 dB. The compressor reduces the level of the wet path; this knob brings it back up before the Mix blend. 0 dB at 12 o'clock.
M/S
Toggles between standard L/R stereo processing and Mid/Side processing. In M/S mode the plugin encodes the stereo signal to mid and side channels, compresses them independently, then decodes back to stereo. The center stays controlled while the sides breathe - no width collapse. Useful on full mixes and wide stereo buses where L/R parallel compression starts narrowing the image.
Bypass
Hard bypass. Passes audio unprocessed. VU needles decay gracefully to rest on bypass rather than snapping off.
VU Meters
Dual VU meters showing output level on left and right channels independently. 300ms ballistic RMS response. When needles track together the stereo image is holding; when one pulls ahead, you know before your ears do.
Suggested Starting Points
- On a drum bus: Gain at unity, Mix at 70%, Threshold to taste, Attack 10-20 ms, auto-release. Add Gain incrementally to drive in saturation character.
- On the 2-bus: Mix at 50-60%, Softer ratio (2:1-3:1), auto-release. M/S mode if the mix is wide.
- For maximum saturation character with minimal compression: Mix at 0%, push Gain to +6 dB or higher.
- Works well before or after Alternate Timeline in a master chain. Before AT for saturation into era character; after AT when you want era coloring first.
Violet Crown
Violet Crown is a free stereo channel strip combining a six-filter EQ section with an RMS bus compressor. Three EQ bands each provide separate boost and cut controls with independent frequency selectors, allowing asymmetric shapes and two independent points of control per band. The compressor uses RMS detection with program-sensitive auto-release. No activation required - no license key, no account, no internet connection needed.
Input Level
Pre-EQ trim, -8 to +8 dB. Applied before the EQ section (or before the compressor section if the routing toggle is set to Comp-first).
EQ Section
Six independent filters across three bands. Each band provides a dedicated boost filter and a dedicated cut filter, each with its own frequency selector. Stack them on the same frequency for a complex shape, or spread them to two separate points within a band.
| Band | Filter Type | Frequency Range | Notes |
|---|---|---|---|
| Low Boost | High shelf | 20 - 100 Hz | Adds low-end weight independently of the cut shelf |
| Low Cut | Low shelf | 20 - 100 Hz | Reduces low-end weight independently of the boost shelf |
| Mid Boost | Peak (bell) | 200 Hz - 5 kHz | Shared Q with Mid Cut |
| Mid Cut | Peak (bell) | 200 Hz - 5 kHz | Shared Q with Mid Boost |
| High Boost | High shelf | 800 Hz - 16 kHz | Adds air and presence independently |
| High Cut | Low shelf | 800 Hz - 16 kHz | Tames harshness independently |
EQ / Comp Routing Toggle
Sets whether the EQ section runs before or after the compressor. EQ-first: equalize the signal before compression, so the compressor responds to the shaped frequency balance. Comp-first: compress first, then shape the tone. Most bus work benefits from EQ-first. Comp-first is useful when you want the compressor to respond to the raw source without the EQ influencing its gain reduction decisions.
Compressor: Threshold
-60 to 0 dB. Default 0 (no compression). Lower the threshold to bring the compressor into action. Uses RMS detection - responds to program energy rather than peak level, which makes it respond more naturally to the overall density of a mix.
Compressor: Harder / Softer
Ratio control, 1.5:1 to 8:1. Tuned for bus use. Lower ratios (Softer) add gentle glue without audible gain control. Higher ratios (Harder) produce more assertive compression. For stereo bus work, 2:1-4:1 covers most cases.
Compressor: Attack
1 to 200 ms. Controls how quickly the compressor engages after the signal crosses threshold. 10-30 ms is a common starting point for bus use - fast enough to control the body without dulling transients.
Compressor: Release
Fully left: program-dependent auto-release. The auto-release adapts continuously - fast when working hard to prevent pumping, slow when barely touching to let the mix breathe. Any other position sets a fixed release from 50 to 2000 ms. For most bus work, start with auto-release.
Compressor: Gain
Makeup gain, -10 to +10 dB. 0 dB at 12 o'clock. Use this to bring the post-compression level back up to match the input level for A/B comparison against bypass.
Bypass
Hard bypass. Both VU meters go dark on bypass.
VU Meters
Dual large VU meters showing output level on left and right channels independently. 300ms ballistic RMS response. When both needles track together the stereo image is balanced. When one leads the other, a level or gain asymmetry is present in the processing chain.
Volume Dealer
Volume Dealer is a true-peak mastering limiter with integrated LUFS metering and a one-click loudness targeting workflow. Load it last on the master bus, play the track, and when Integrated LUFS stabilizes, click Set Level - the plugin calculates the corrective gain and applies it in a single step. No activation required. Free - no license key, no account, no expiry.
Core Workflow
- Insert Volume Dealer last on the master bus.
- Play the track from the beginning. Watch the Integrated LUFS display accumulate.
- Once the reading stabilizes, set your Target LUFS to the delivery spec (-14 LUFS for streaming, -16 for podcast, etc.).
- Click Set Level. The plugin applies the exact corrective gain offset in one step.
- The Gain Applied readout confirms the offset. The limiter holds the ceiling from there.
- Use Reset to clear the Integrated LUFS accumulator and re-measure after any change.
Target LUFS
The loudness target Set Level aims for. Click the display and type a value, or use the scroll wheel to adjust. Common targets: -14 LUFS (streaming - Spotify, Apple Music), -16 LUFS (podcast), -23 LUFS (broadcast, EBU R128), -24 LUFS (US broadcast, ATSC A/85).
Output Ceiling
Sets the true-peak ceiling the limiter holds. Range -6 dB to -0.01 dB. Click the display and type a value, or use the scroll wheel to adjust - same interaction as Target LUFS. Set it to whatever your delivery spec requires. Some engineers prefer -0.03 dB, broadcast specs may require -1 dB or lower, streaming delivery commonly uses -0.1 dB or -0.3 dB. The ceiling is yours to define.
Input Trim
Pre-limiter input trim, -12 to +12 dB. Applied before metering and limiting. Use this for coarse level adjustments before Set Level handles the fine targeting.
Edge Rounding
Controls the softness of the limiter knee. Range 0-100%. At 0% the limiter is a hard brick wall - gain reduction only begins at the ceiling. Higher values start gain reduction 6 dB below the ceiling for a less aggressive character on dense material. Most mastering work sits between 0% and 30%. At higher settings the limiter sounds less like a limiter and more like a compressor with a fixed ceiling.
Quality Mode
Selects the limiter operating rate.
- Standard - Limiter runs at native session sample rate. Low latency, suitable for tracking and monitoring.
- High - Limiter runs at 2x the session sample rate using an IIR half-band polyphase filter. Inter-sample peaks that exceed 0 dBFS on playback reconstruction are visible and caught. Use this mode for final export.
The Latency display reports lookahead plus oversampling filter delay in milliseconds and communicates this to the host for automatic delay compensation.
Dither
Noise-shaped dithering applied at export. Three positions:
- Off - No dithering. Use when working entirely within the session bit depth.
- 24-bit - Noise-shaped dither for 24-bit delivery.
- 16-bit - Noise-shaped dither for 16-bit delivery (CD masters).
Enable dither only when exporting below the session bit depth. For a 32-bit float session exporting to 24-bit WAV, use 24-bit. Do not leave dither on during normal mixing.
LUFS Metering
Volume Dealer runs a full BS.1770 LUFS metering suite alongside the limiter.
| Meter | Window | Use |
|---|---|---|
| Integrated LUFS | Running average from last reset | The number Set Level acts on. Accumulates from playback start. |
| Momentary LUFS | 400 ms or 3000 ms sliding (selectable) | Short-window loudness density. Useful for spotting loud passages. |
| Short-Term LUFS | 3-second average | Calmer view of overall level during playback. Good for judging section dynamics. |
Toggle between BS.1770-3 and BS.1770-4 without restarting measurement. BS.1770-4 adds a gating stage that excludes near-silence passages from the integrated average - relevant for tracks with dynamic intros or outros.
VU Meters
Dual analog-style VU meters with 300ms ballistic RMS response. Show post-limiter output level at all times. On well-controlled material the needles should settle into a consistent range - if they are bouncing into the red on every hit, the ceiling is working very hard and Edge Rounding or Input Trim adjustments may help.
Bypass
Hard bypass. VU needles settle naturally on bypass. Integrated LUFS continues to accumulate in bypass so your measurement is not interrupted.
Latency and Tracking
Volume Dealer reports 250 samples of latency to the host. That is the lookahead window - the limiter delays the audio slightly so it can read what is coming before it arrives, then starts gain reduction early enough that the peak never reaches the ceiling. Without that window the limiter is reacting after the fact; fast transients exceed the ceiling before gain reduction fully engages, and the brickwall guarantee disappears. The 250 samples is the margin between a true-peak ceiling and something that just tries its best.
During mixing and export this is handled automatically by your DAW's plugin delay compensation, so it is a non-issue at that stage. Tracking is where it matters - PDC means your monitoring is slightly behind what you are playing.
Workaround for tracking: Note how much gain Volume Dealer is adding via the Gain Applied readout, then place a low-latency limiter with a -0.1 dBFS ceiling on the 2-bus while tracking at the same gain offset. Swap in Volume Dealer once you are in the mix where the latency does not matter. Protection stays consistent and you are not fighting the monitoring delay.
Reference Player
Reference Player is a standalone audiophile media player - free on Windows and Linux. It is not a DAW plugin, so the VST3 installation, activation, and demo mode sections above do not apply to it. See the Reference Player page for the full feature list and download.
Windows Installation
Reference Player for Windows is distributed through the Microsoft Store. Install directly from the Store listing - there is no manual file placement, unlike the VST3 plugins above. If the Store installer fails or hangs, see Known Issues below.
Known Issues
Logic Pro on macOS Tahoe - License prompts every session
Status: Fixed in all plugin builds as of June 2026. Earlier builds stored the license in a file that Logic Pro's sandbox could not reliably write to on macOS Tahoe (macOS 26). Updated builds store the license in the macOS Keychain instead, which is always accessible to sandboxed apps. No Full Disk Access required.
Fix - three steps:
- Log in to My Account › Downloads and download the latest version of the plugin.
- Extract the zip. Open the
macos/folder and install the.vst3and.componentbundles as described in the Installation section above, replacing the existing files. - Open Logic Pro, load the plugin, and activate once with your email and license key. The license is now stored in the Keychain and will persist across every session automatically.
If you activated under a different DAW (Reaper, Logic, etc.) before updating, those activations remain valid. Re-activating in Logic after the update uses one activation slot. You have 3 total - manage them at My Account › Licenses if needed.
Affects any licensed plugin built before June 2026. Every licensed plugin released since then includes the Keychain fix by default. Violet Crown, Volume Dealer, and Iron Deck are free plugins with no activation - not affected.
Reference Player (Windows) - Microsoft Store installer fails or hangs
Reference Player for Windows installs through the Microsoft Store. Occasionally the Store installer stalls, fails partway, or reports a generic error with no clear cause. This is a Microsoft Store platform issue, not a problem with Reference Player itself - we do not control the Store's install pipeline and cannot fix it from our side.
Microsoft's own systems may also send an automated email about the install, sometimes from a no-reply address. Those come directly from Microsoft, not from M Media Audio - we have no visibility into their content or timing.
If installation fails:
- Close the Store app fully and retry the install.
- Check for pending Windows updates - Store installer issues often clear up once Windows itself is current.
- Restart the machine and retry once more.
If the Store install keeps failing after retrying, contact info@mmediaaudio.com. We can't fix the Store pipeline, but we can help confirm it isn't a Reference Player-specific problem.
FAQ
.vst3 folder (not its contents) is in C:\Program Files\Common Files\VST3\. Run a full plugin rescan in your DAW. Some DAWs require a restart before rescanning will detect new plugins.Windows Security > Device Security > Core Isolation > Memory Integrity and Windows Security > App & browser control > Smart App Control - if either is on, that is the most common cause. If disabling these does not resolve it, contact info@mmediaaudio.com with your Windows version and DAW name.libsodium.so.23: cannot open shared object file: No such file or directory.libsodium for license verification, and most Linux distros do not include it by default. Install it once per machine: sudo apt install libsodium23 on Ubuntu/Debian, sudo dnf install libsodium on Fedora/RHEL, or sudo pacman -S libsodium on Arch. Restart your DAW and rescan after installing. This is a one-time system dependency, not a problem with the specific plugin or your install of it.license.mmediaaudio.com. Check that your firewall, VPN, or DAW sandbox is not blocking outbound connections from the plugin. If you are behind a corporate network, you may need to whitelist the domain. If the problem persists, contact info@mmediaaudio.com.%APPDATA%\MMediaAudio\ as a settings file per plugin. Deleting this file will remove the local license record and the plugin will prompt for activation again on next load.Use the AU version in Logic. Logic Pro's native format is Audio Units. Install the .component file into /Library/Audio/Plug-Ins/Components/ - not the VST3. Logic will not reliably surface the VST3 version for most users.
Logic silently blocks plugins that crash or fail validation during scanning. To check:
- Open Logic Pro.
- Go to Logic Pro (menu bar) › Plug-in Manager.
- Search for the plugin name. Check the Status column — Validated means it is working, Blocked means Logic quarantined it.
If the plugin shows as Blocked: Select it in the list and click Reset & Rescan Selection in the top-right corner. If it validates successfully, status changes to Validated and it will appear in your plugin menus.
If the plugin does not appear at all: Confirm the .component file is in /Library/Audio/Plug-Ins/Components/. Then return to Plug-in Manager and click Rescan All.
If macOS itself is blocking it: Go to System Settings › Privacy & Security and scroll down. If there is an Allow Anyway button next to a blocked item, click it, then rescan in Logic.